
I have contemplated a DIY headboard for awhile. I have also teeter-tottered through various options of how I wanted to create one. I finally decided that for this apartment, I wanted the cheapest way, even if that meant it would be temporary. Which actually works out perfectly considering I know my next bedroom will have a completely different design.
If you are looking to make something that will last through the years, check out this great tutorial, and also this one from Lea on my blog!
Otherwise, if you’re looking to save some cash that can be spent elsewhere, let’s carry on!
You will need:
-5 White foam poster-boards $14.95
-Duct Tape – $3.99
-2 yards of fabric – (SALE section people… mine was $14)
-Polyfill Stuffing – $5.99
-Box cutter or exacto knife
-Ruler
-Scissors

You will start out by calculating how many squares you want and how wide your bed is, and how tall you want the headboard to be. It’s all up to your preferences. I have a queen size bed, and I did 18 squares, each 10×10.
Once you have your measurements, you can simply start by cutting out the squares of your foam posterboard using your box cutter.
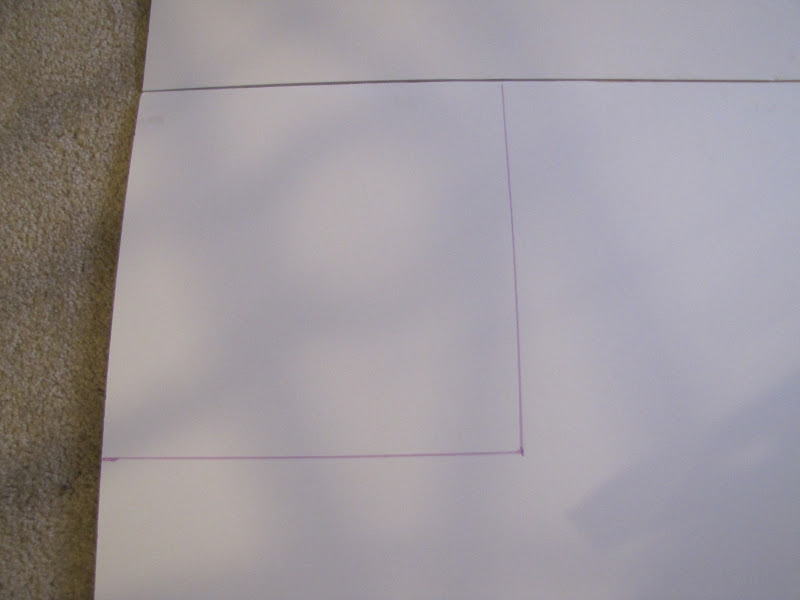
*** I think this is the most important tip of the whole DIY project; make sure your squares are cut perfectly to your measurements, otherwise they won’t fit together. Even the tiniest difference will show. ***
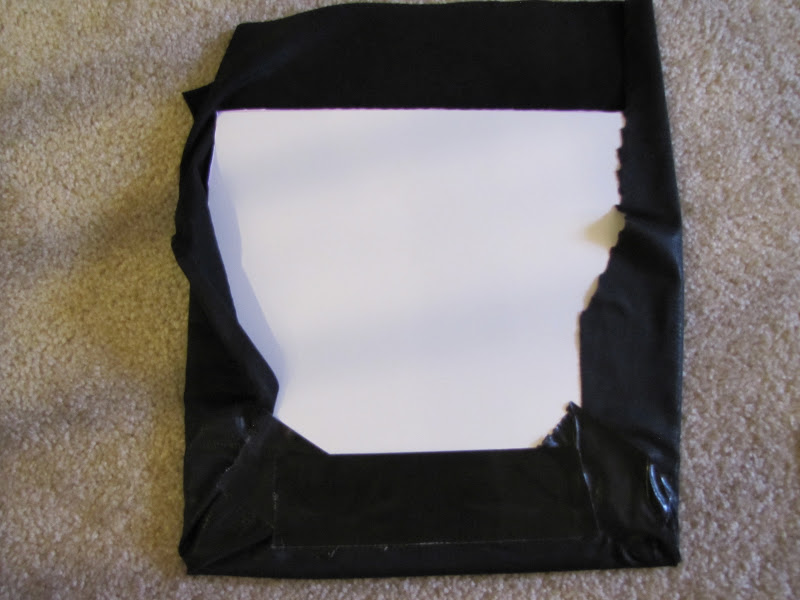
Once you have all of the squares cut, cut the fabric to leave about an inch and a half on each side.

*** Note: Make sure your if your fabric is not cotton, you use a cotton fabric as a lining. Otherwise the polyfill will come through the fabric. ***
Start by duct-taping the fabric on the bottom and sides of the square, creating a little pocket for you.

Take a few handfulls of polyfil and stuff it into the pocket. (I used about 4 large hand-fulls of polyfil for each square.)

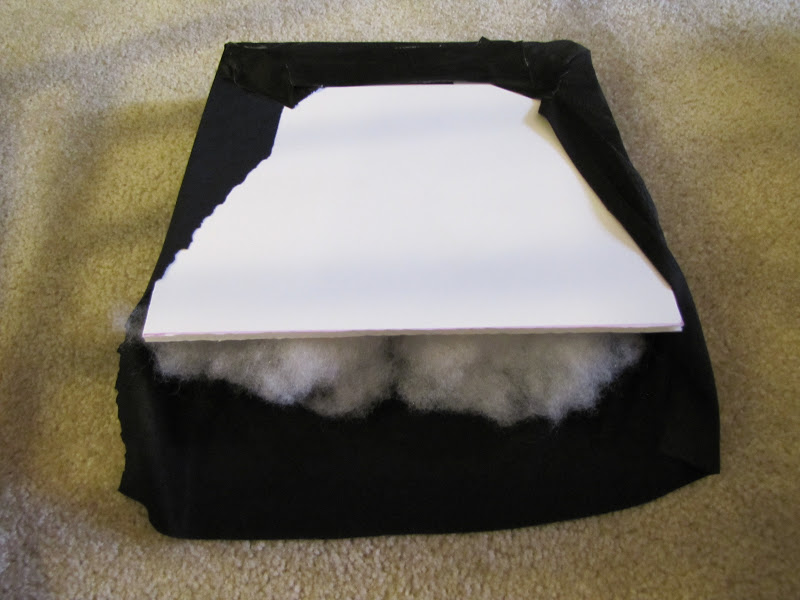
Then tape the fabric over the top. For the corners, just make sure you pull it tightly and fold the fabric over itself.
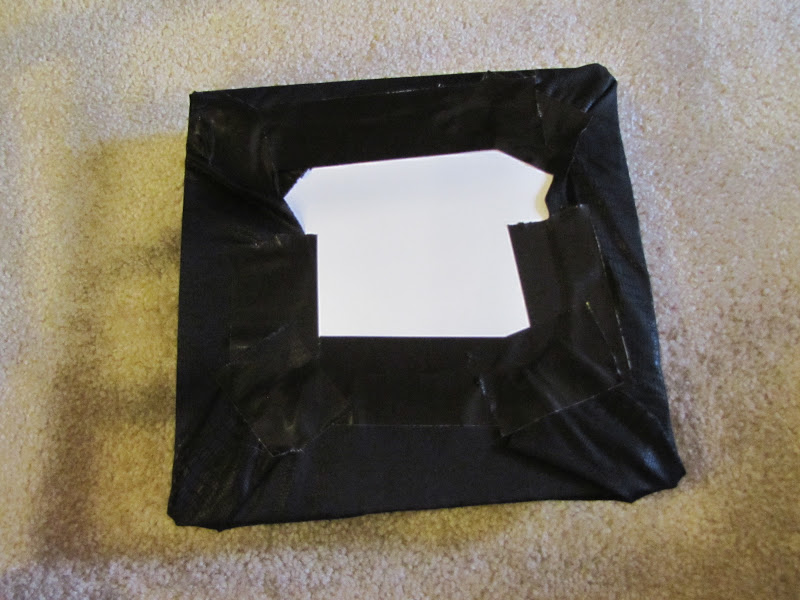
Repeat each step until you have all squares done. I laid mine out to make sure they all fit together perfectly, and numbered the back of each square so I knew where it would go on the wall.
Then I cut 4 extra strength velcro pieces into 18 pieces, and fastened them to the back of the boards.
I put the back part of the velcro on as well, and took off the sticky backing so I could just press it onto the wall and not have to worry about matching up velcros. Make sure you start from the bottom corner, and work your way across and then up.


I am so pleased with the results, and so is J. He says it looks like the bed is “fit for a king”, which is exactly how a bed should look in my opinion! I had originally thought about doing a white ostrich leather but now I am so glad we went with black. Plus it has a hint of snakeskin so naturally, I’m obsessed.

Grand total is…
$38.93
(that’s not even counting my coupons used from Michael’s and Joann’s… so it’s actually less than that!)
Next step… bedding!
xoxo,
H
No way! This is insane!! Can not believe you made this for that cheap. It looks sooooo good!
WOW! This looks great!
Wow, that looks amazing! I can't believe you were able to do that for such little money.
xo, alison*elle
Hannah! I cannot believe you did this by yourself! The outcome is gorgeous!!! One of the best DIYs I've seen ina while! Also, I put you on my Link Love section of my blog. Always loving your blog and inspirations 🙂
xx
Holly Foxen Wells
GlamourMash
wow, this is gorgeous!! i am really impressed! want to make another black one and ship it up to boston? 😉
xoamy
http://www.cupcakesncouture.com
WOW! I can't believe that GORGEOUS headboard came from foam board! Truly amazing!
I made my own headboard as well and it's super simple! Yours turned out so well!
Xoxo
Makenzie
Wow! That look so legit. Amazing I wish I had the savvy to do a project like this, I'm obsessed.
xx
Krissie
http://thecriminallyexpensive.blogspot.com
This is such a cute idea!!!! LOVE LOVE your blog!
xx
Justine
http://www.sobeanie.blogspot.com
This looks amazing! I might have to spend my Saturday morning making one myself..thanks for the awesome idea!
oh wow, i'm so impressed with your craftiness. and 38.93!? steal!
Hey that's a good looking headboard! Good thought with the foam core, I never would have thought about that. Keep up the good work.
-Nick @ Sawdust and Embryos
jordan shoes
fitflops shoes
kate spade outlet
new balance shoes
cheap jordans
coach outlet online
coach outlet online
vans outlet store
stephen curry basketball shoes
air jordan shoes
polo ralph lauren
abercrombie & fitch
true religion outlet
nmd adidas
fitflops
adidas superstars
michael kors outlet stores
coach factory outlet online
instyler max
coach purses on sale
ralph lauren
jordan pas cher
valentino bags
fitflops sale clearance
valentino
michael kors outlet
coach outlet store
yeezy boost 350 white
armani outlet
cheap ray bans
rolex submariner
coach outlet online
versace sunglasses wholesale
gucci borse
oakley sunglasses outlet
micahel kors
coach outlet online
fitflops
ghd hair dryer
ferragamo outlet
chenzhen20160428